A Truss Is Not a Big Board. Stop Cutting It.
By Cody Johnston, PE, MBA · · 11 min read
Here’s the situation I get called out to about twice a month. Somebody needs to run a duct, or wants a little more headroom in the attic, or the tub drain lands right where a piece of wood is. There’s a stick of 2×4 in the way. They cut it. It’s just a 2×4, right?
It is not just a 2×4. It was a 2×4 at the lumber yard. The moment it got pressed into a truss, it became a specific member carrying a specific force that an engineer calculated to two decimal places. Cutting it is closer to cutting a link out of a chain than it is to trimming a stud.
I want to explain why, not just tell you no. Fair warning: that means we’re about to get a little enginerdy. I’ve made peace with what I am. Stick with me anyway, because once you understand the physics, the rule stops feeling arbitrary and starts feeling obvious — and you’ll never look at your attic the same way again.
Why a Board Bends at All
Take a wooden yardstick. Lay it flat across two chairs and press down in the middle. It flops. Now turn it on edge — same stick, same wood, same everything — and press down again. It’s suddenly stubborn.
You didn’t add material. You just moved it further from the middle.
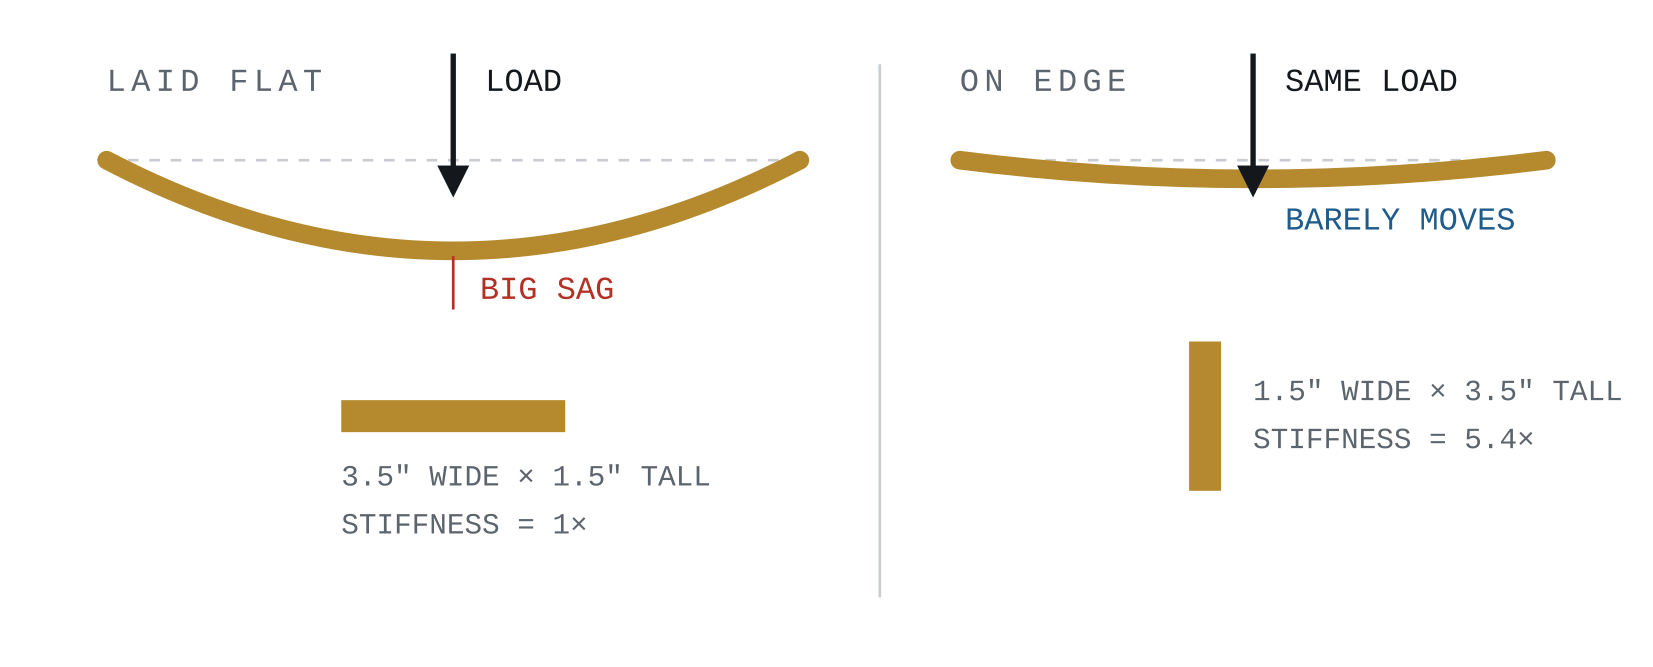
Fig. 01 — Same board, same load, same wood. Rotating it 90° makes it roughly five and a half times stiffer. Depth is everything.
This is moment of inertia
Engineers call that number the moment of inertia — the letter I on our calculation sheets, and yes, it is genuinely one of my favorite things in the world. (I warned you about the enginerdy part.) Forget the name. Here’s the only thing you need to remember about it:
Stiffness depends on depth cubed. Double the depth, get eight times the stiffness — for the same amount of wood.
Cubed. Not doubled. Cubed. That’s why a 2×12 joist isn’t twice as good as a 2×6 — it’s about eight times better in bending. It’s why an ice skate blade is deep and thin instead of flat and wide. It’s why a sheet of paper won’t hold a penny, but fold it into a fan and it’ll hold a coffee mug. Same paper. Different depth.
The dirty secret: the middle of a beam is loafing
When a beam bends under load, the top edge gets squeezed shorter and the bottom edge gets stretched longer. Squeezing is compression. Stretching is tension. Between them is a line where the wood isn’t doing much of anything — we call it the neutral axis, and it’s basically on break.
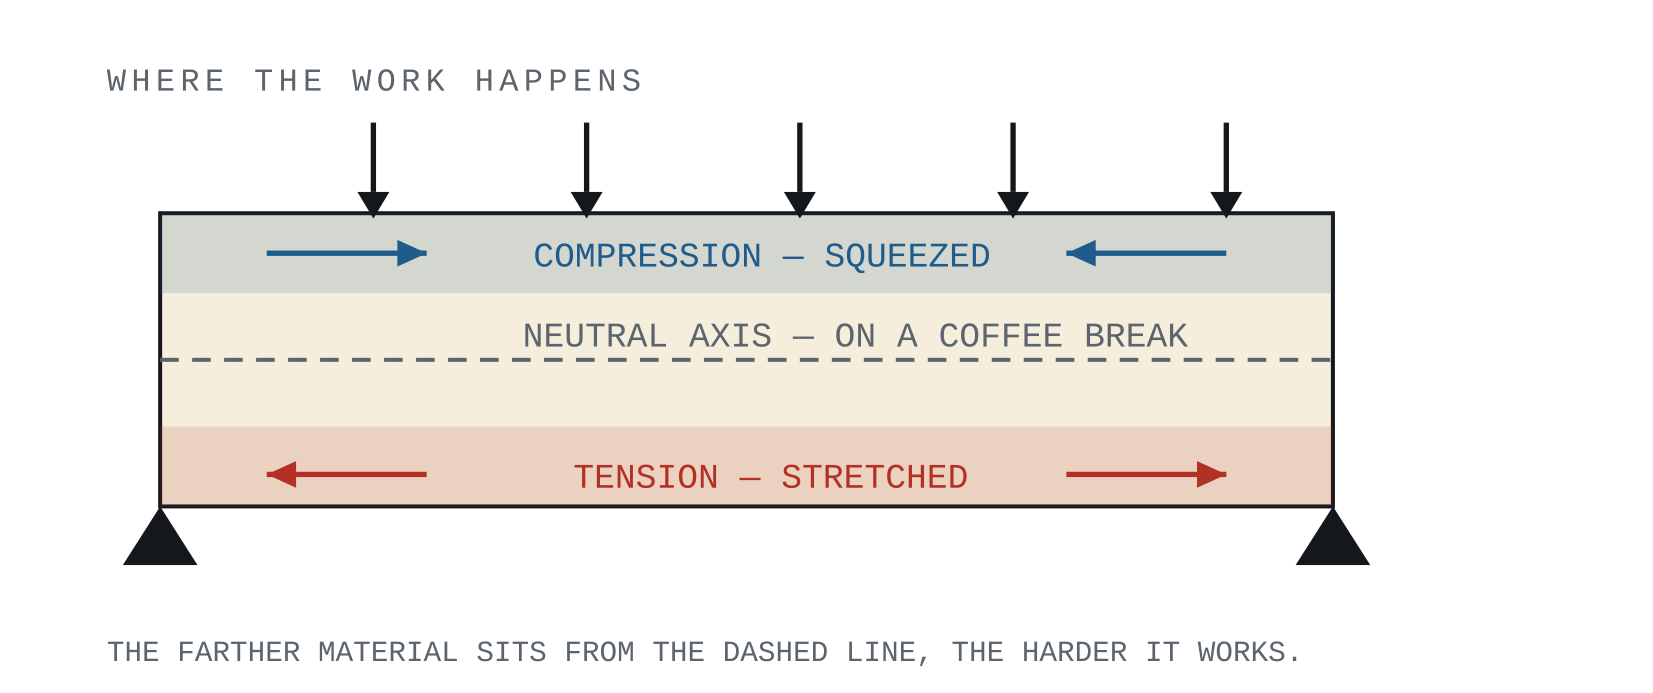
Fig. 02 — In any beam, the top squeezes and the bottom stretches. The middle third contributes almost nothing to bending strength — which is exactly the inefficiency a truss is built to exploit.
So an engineer looks at that picture and thinks: why am I paying for all that lazy wood in the middle?
That question is the entire reason trusses exist.
A Truss Is a Beam With the Boring Part Deleted
Take the top edge that’s getting squeezed. Keep it. Call it the top chord.
Take the bottom edge that’s getting stretched. Keep it. Call it the bottom chord.
Throw away the loafing middle — but you can’t throw away all of it, because something has to hold those two chords apart at the right distance and shuttle force between them. So put back a skeleton of skinny diagonal sticks. Those are the webs.
Now you have a member that’s 24 inches deep instead of 11¼ inches deep, weighs less than a big solid beam, spans farther, and costs less. Remember: depth cubed. That extra depth is where all the performance comes from.
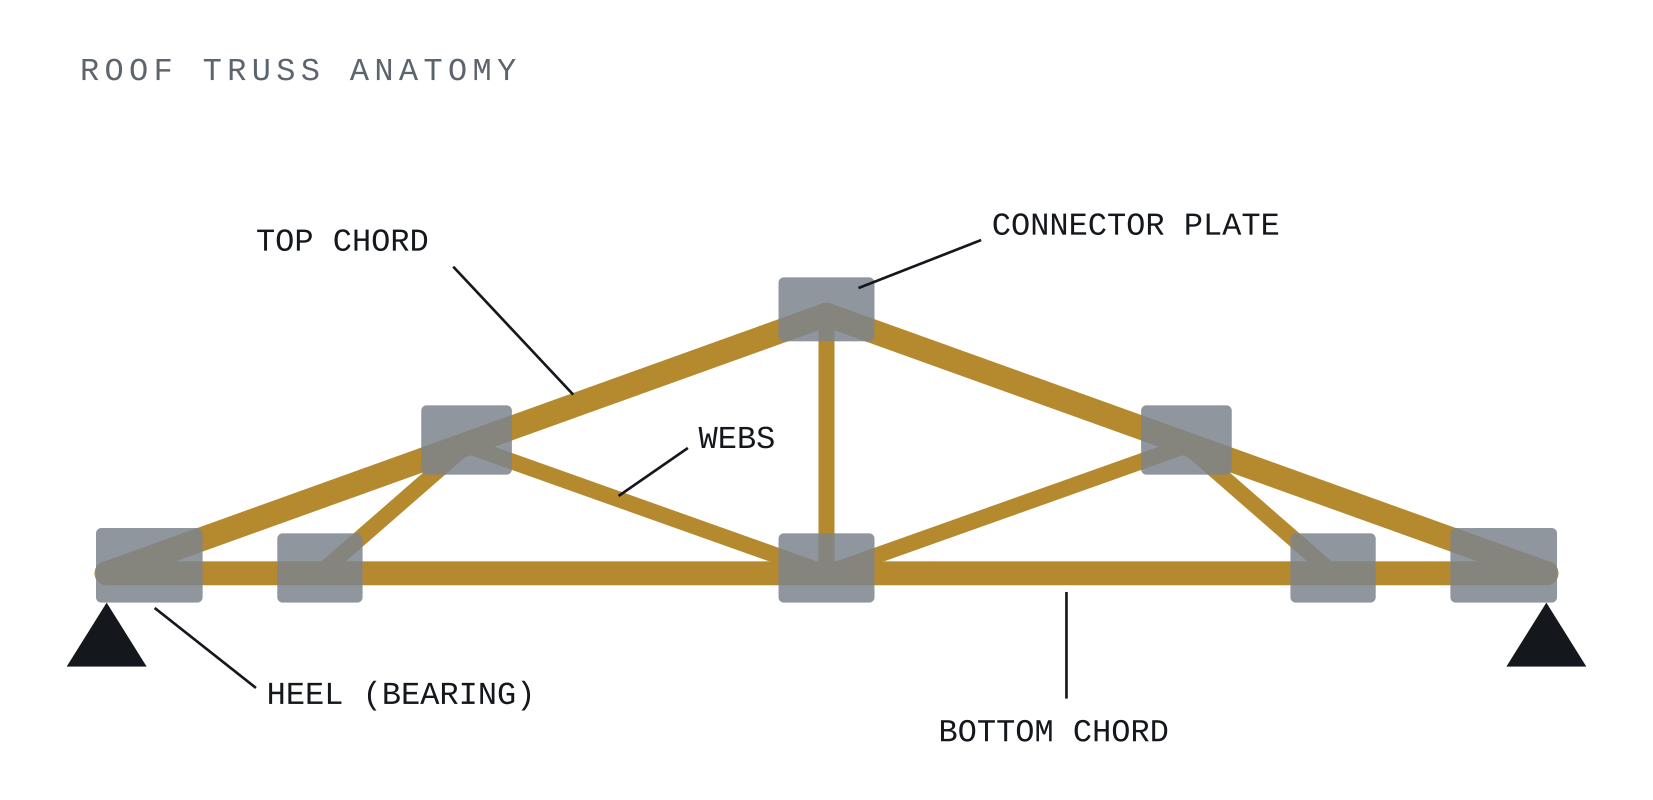
Fig. 03 — The parts. Chords are the top and bottom rails. Webs are the diagonals and verticals between them. The gray rectangles are toothed steel connector plates — more on those, because they matter more than people think.
Here’s the part that changes everything
In a solid joist, the wood bends. In a truss, almost nothing bends. Every member is instead being either pulled straight along its length or pushed straight along its length. Pure tension, pure compression, no drama.
That’s a wildly more efficient way to use wood, and it’s why a 2×4 top chord can span 30 feet in a truss when a 2×4 joist couldn’t span 8. But it comes with a catch, and the catch is the whole point of this article:
A bending beam is a soloist. A truss is a band. Fire the wrong member and the whole song stops.
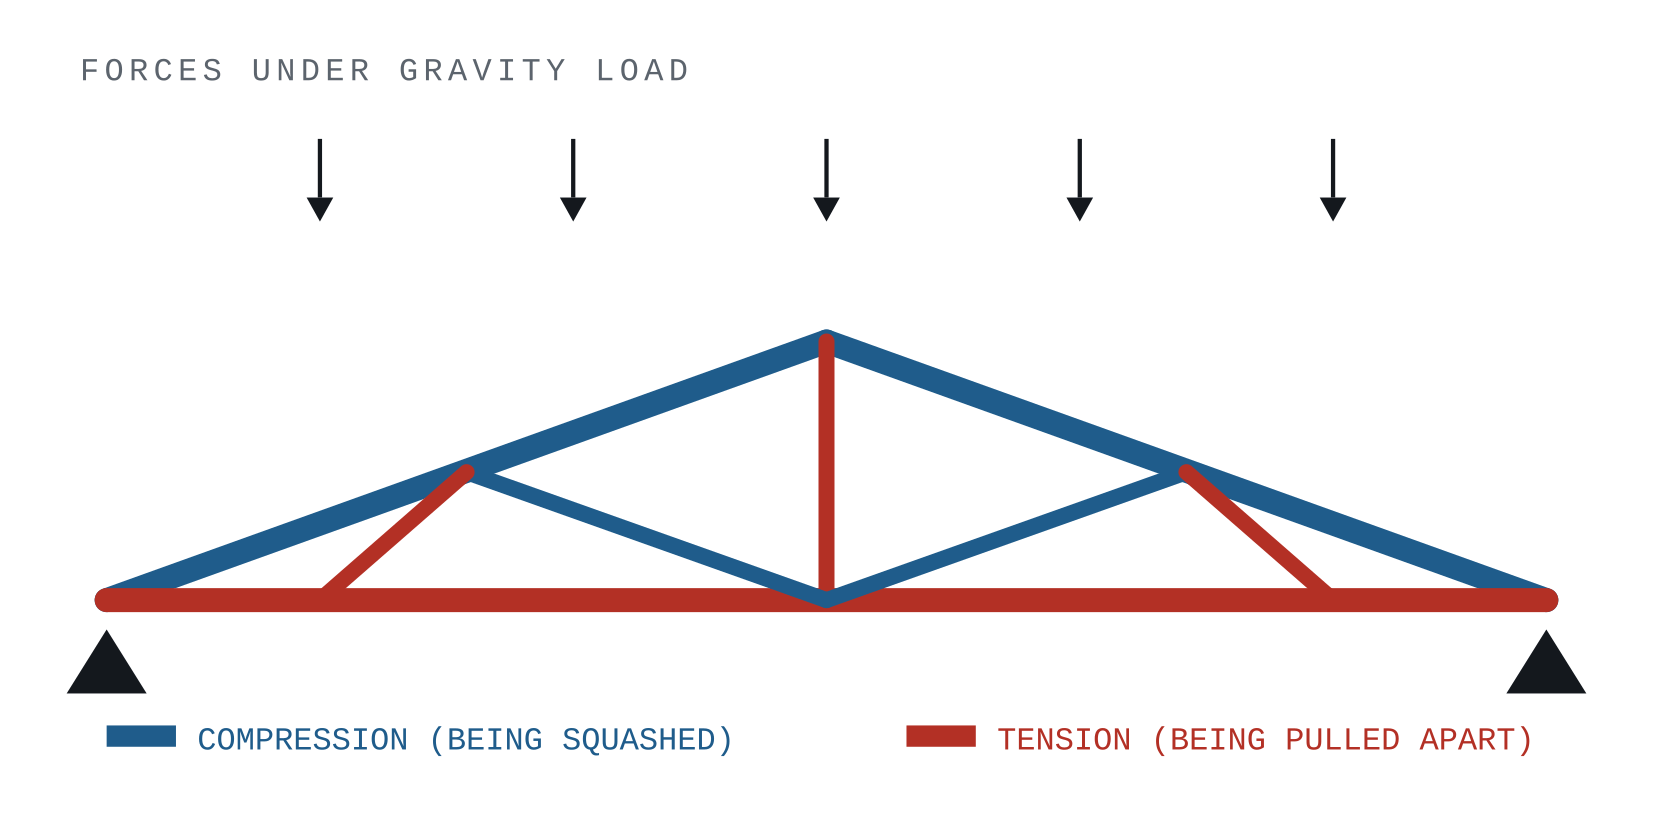
Fig. 04 — Notice the webs alternate — some push, some pull. You cannot tell which is which by looking at it, and the pattern changes with snow load, wind uplift, and where you stand in the attic. That’s why “it looked like a spare one” is not a structural argument.
Why Triangles and Not Squares
Every web pattern you’ll ever see is made of triangles. That’s not styling. A triangle is the only shape whose form can’t change unless the length of a side changes — and changing a side’s length means stretching or crushing solid wood, which takes enormous force.
A rectangle, on the other hand, will happily fold over into a parallelogram while every corner joint stays intact. Push on a square picture frame; watch it lean. That’s called racking, and it’s the failure mode trusses are designed to never experience.
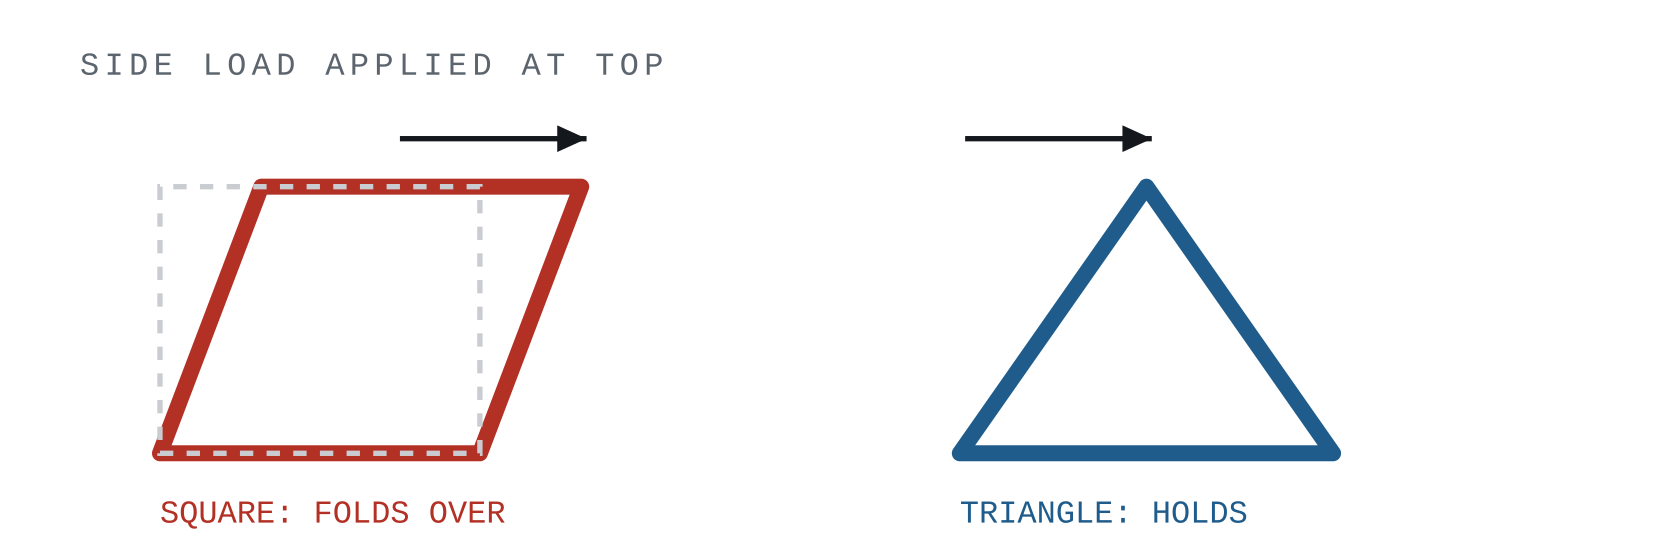
Fig. 05 — Remove one web and you convert two triangles into one big quadrilateral. You just built the shape on the left, inside your roof.
Those Little Metal Things Are Structural
The gang-nail plates at each joint look like an afterthought. They are not. Each plate size, orientation, and tooth count was selected by software to transfer a specific number of pounds. The teeth are only pressed about ¼ to ⅜ inch into the wood, and their capacity depends entirely on how many teeth are in each piece of wood on each side of the joint.
Which leads to a short list of things I see people do to plates that quietly wreck them:
- Prying a plate up to slip a wire or strap behind it. The teeth never go back the same way; they’re done.
- Hitting a plate with a hammer to “flatten it out.” You just backed the teeth out of the wood.
- Notching wood right at the edge of a plate, which removes the very fibers the teeth were gripping.
- Letting a plate rust from a roof leak and assuming it’s cosmetic. It’s a steel connector; section loss is strength loss.
Field note: If a plate has backed out more than about 1/8 inch, is bent, is missing, or is corroded, that joint needs an engineered repair — not a few screws and optimism.
What Actually Happens When You Cut One
Say you cut a single web in a roof truss to get a duct through. Here’s the chain of events, and it’s fast:
- The load doesn’t disappear. It goes looking for another path. Force always finds a way down to the foundation, or it finds a way to break something.
- The next member over gets the load. That member was designed with a safety margin — but the margin is for snow and wind, not for absorbing a neighbor’s entire job.
- The chord now has to bend. A top chord that was designed for pure compression suddenly has to span twice as far unsupported, and bend while doing it. That’s not what it was picked for.
- The compression chord can buckle. This is the scary one. A member in compression fails by suddenly bowing sideways, not by slowly crushing. It’s the difference between a rope tearing and a soda can popping. There’s no warning, and buckling capacity drops off a cliff when unbraced length goes up.
- Deflection shows up in drywall. Cracks over doors, a sagging ceiling line, doors that won’t latch, a ridge that dips.
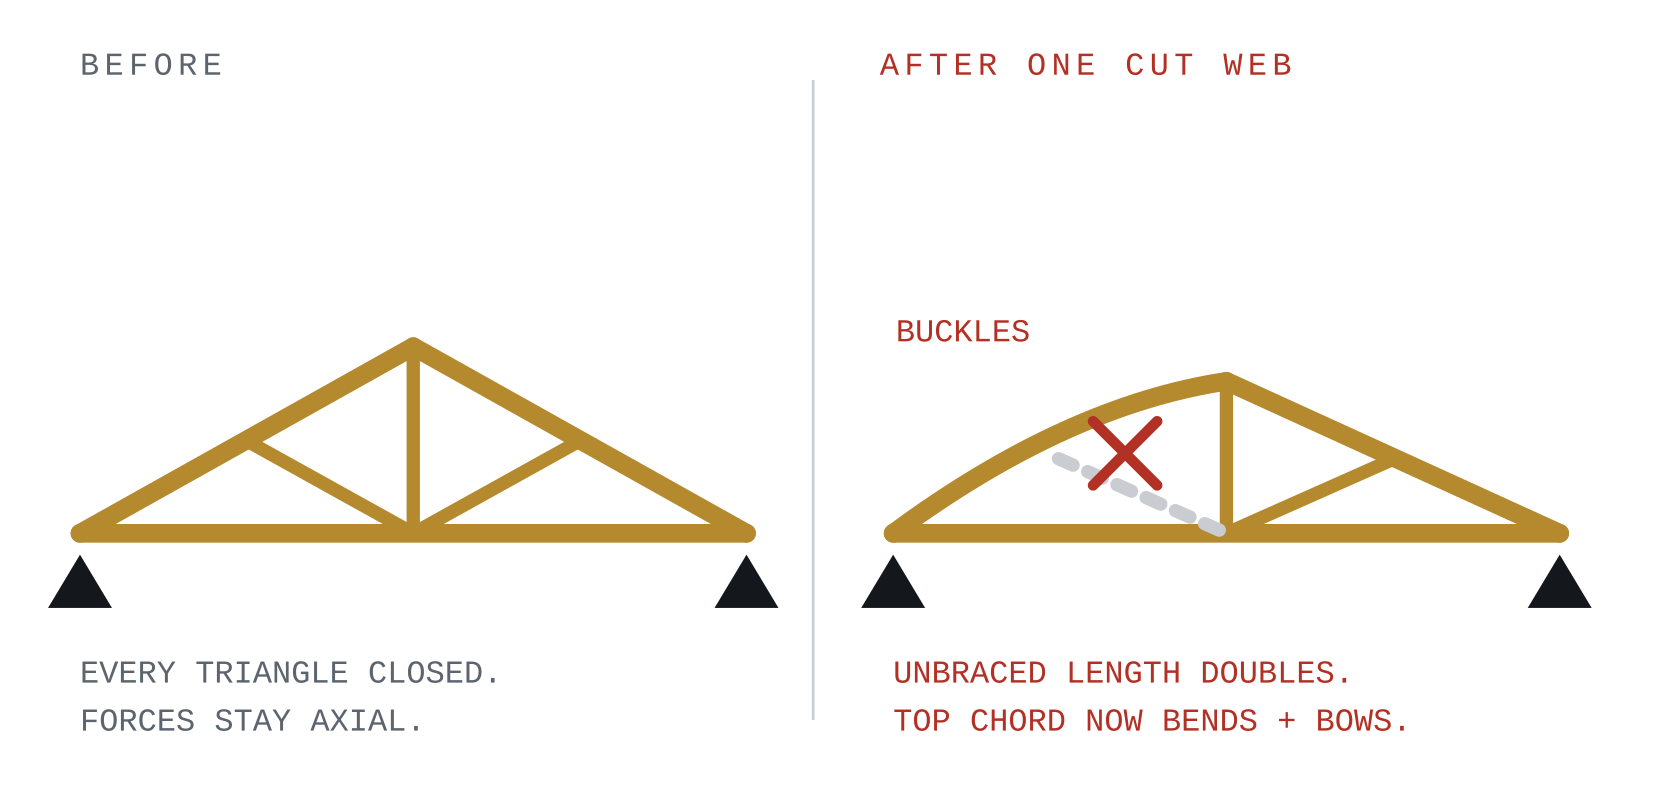
Fig. 06 — One missing web. The top chord’s unbraced length doubles, and compression members lose capacity dramatically as unbraced length grows. This is the failure people don’t see coming.
The one that surprises people: Bottom chords are usually in tension, and tension members are brutally sensitive to notches and holes. Removing 25% of the cross-section can cost you far more than 25% of the strength, because the notch concentrates stress right at the cut. A tension member fails at its weakest inch, not its average inch.
Floor Trusses: Yes, There’s a Hole. No, You Can’t Make a New One.
Open-web floor trusses are the parallel-chord version: flat top chord, flat bottom chord, and webs zig-zagging between. They’re popular precisely because of the openings — you can run a 6-inch round duct, drain lines, and a whole home run of wiring through the middle without touching a thing.
That’s the deal. The chases are the feature. Use them, and use them as-is.
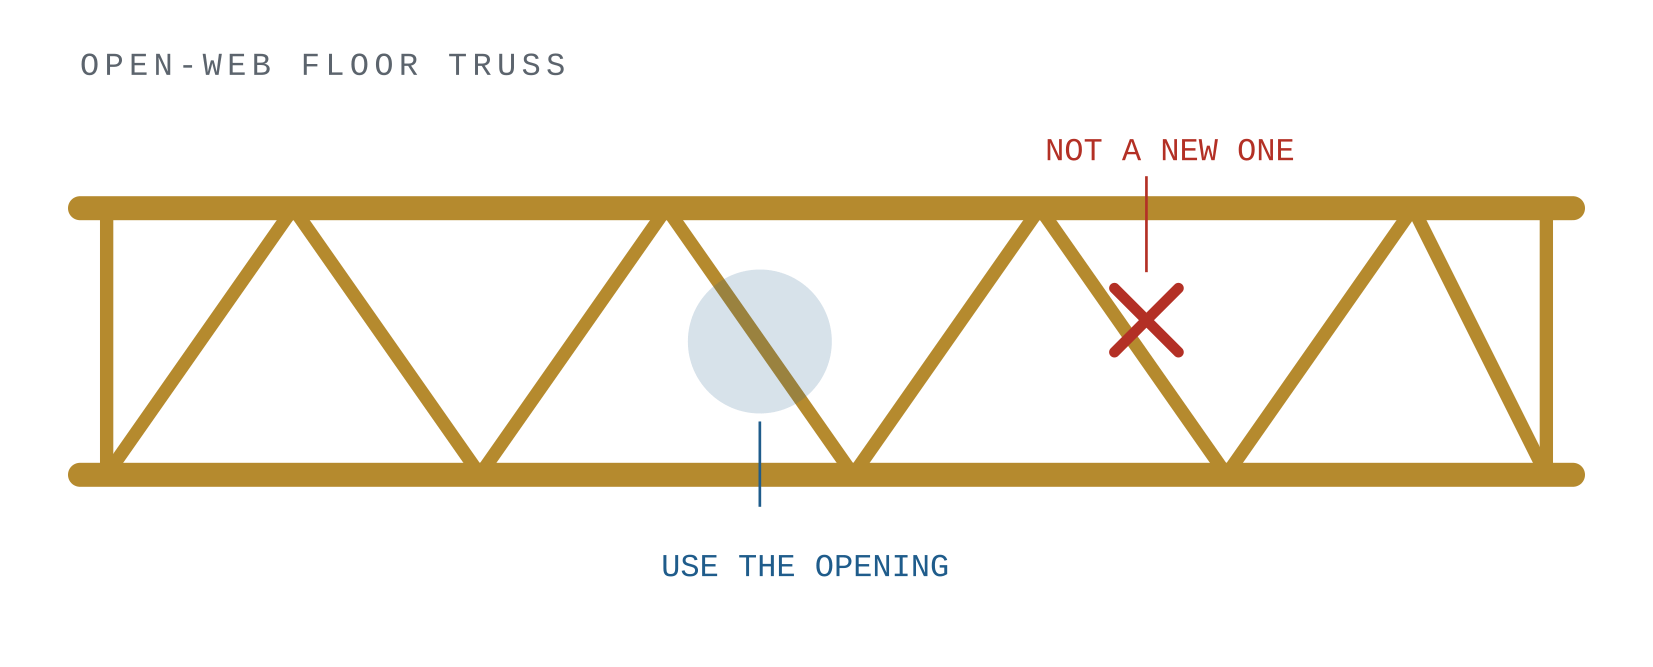
Fig. 07 — The openings between webs are the intended path for mechanicals. Cutting a web to make a bigger hole removes the shear-carrying element of that panel.
One more floor-truss specific gotcha: those bottom chords are frequently designed assuming the drywall ceiling below is attached and providing lateral bracing, and the top chords assume the sheathing is glued and nailed. Strip the ceiling for a remodel and leave it open for six months while you stack materials up there, and you’ve changed the assumptions the design was based on.
The Cheat Sheet: What You Can and Can’t Do
| The thing you were about to do | Verdict |
|---|---|
| Cut, notch, or drill a chord — top or bottom, any size hole | NEVER without an engineered repair |
| Cut or remove a web, even a “spare-looking” one | NEVER without an engineered repair |
| Run wire or small pipe through an existing web opening | Fine |
| Nail sheathing, drywall, blocking, and hangers to chords | Fine — that’s the design intent |
| Hang a heavy bag, hoist, or car lift from a truss | Absolutely not without design review |
| Add a second layer of roofing over the first | Check first — dead load increase |
| Remove the bottom chord for a vaulted ceiling | This is the one that spreads the walls apart |
| Cut just the very tail/overhang beyond the wall | Check first — the heel joint region is critical |
| Repair a cracked member with plywood and a lot of screws | Only per an engineered detail with a nailing schedule |
About that bottom chord and the vaulted ceiling
This deserves its own paragraph because it’s the most common catastrophic idea I hear. The bottom chord isn’t just the ceiling nailer. It’s the tie that keeps the two sloping top chords from spreading. A roof truss is essentially a triangle whose bottom side is a rope pulled tight. Cut the rope and the peak drops while the walls push outward — which is exactly the mechanism behind bowed exterior walls and a swaybacked ridge.
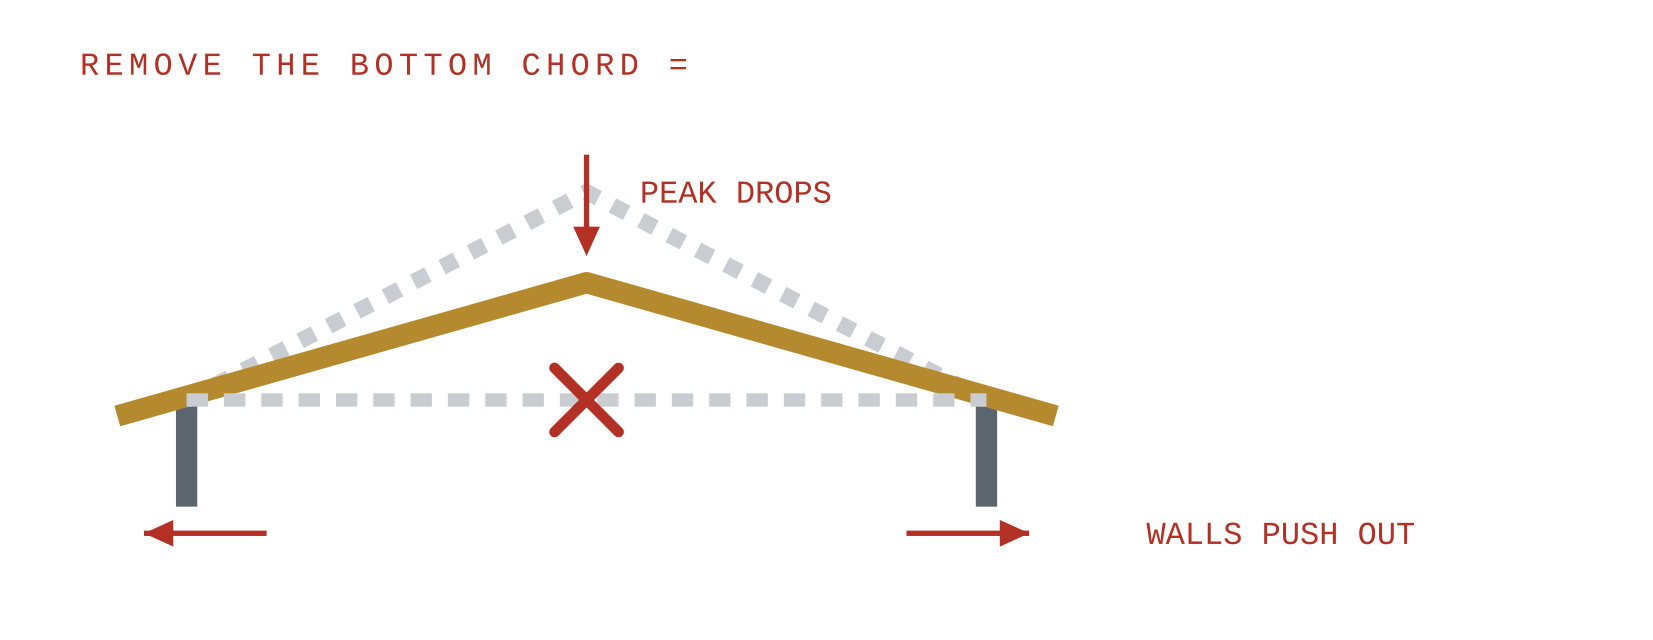
Fig. 08 — The bottom chord is a tie in tension. Without it, the triangle opens, the ridge sags, and the exterior walls get pushed outward at the top plate.
What an Engineered Truss Repair Actually Looks Like
Good news: almost anything can be repaired. I’ve fixed trusses that had a 14-inch hole hacked through the bottom chord. The repair usually isn’t even that expensive — it’s the discovery two years later, after the drywall is up and the ceiling is cracking, that costs money.
A legitimate repair detail is a drawing, sealed by an engineer, that specifies:
- The exact material — plywood gusset thickness and grade, or scab lumber size and species
- The exact fastener — nail or screw type, length, quantity, and spacing pattern
- How far the repair must extend past the damage in each direction
- Whether the truss needs to be temporarily shored while the work is done
- Whether adjacent trusses need to be sistered or braced
Also worth knowing: the truss manufacturer’s engineer sealed the individual truss design drawings, but that seal covers the truss as manufactured, sitting in the specified span with the specified loads. The moment it’s modified in the field, that seal doesn’t apply to what you now have. A field modification needs its own engineering. (If you’re curious how those manufacturer drawings fit into the bigger picture, here’s the full truss submittal workflow, step by step.)
If you already cut one: Don’t load it further, don’t hide it behind drywall, and take clear photos of the damage plus the truss ID tag or design drawing if you can find it. Most repairs I write take a few hours to detail and a couple of hours in the field to install. The version where you wait is the one that turns into a claim.
Three Sentences You Can Keep
One. A truss works by pushing and pulling along straight members, not by bending, which is why it can be light and deep and span forever — and why no stick in it should ever meet a saw without an engineer’s blessing.
Two. Depth is what makes anything stiff, and stiffness scales with depth cubed, so those chords are only doing their job as long as something is holding them apart at the exact spacing they were designed for.
Three. If wood needs to be removed from a truss, the answer is an engineered repair detail, and it costs a fraction of what discovering the problem later does.
Dimensional lumber forgives. A truss doesn’t. Treat it like the engineered product it is, and it’ll outlast the shingles, the siding, and probably you.
Got a truss that’s already been cut? Send photos. It’s almost always fixable.